How to Read Knitting Pattens - part 3
Welcome to our series on learning how to read knitting patterns.
If you missed the first two posts:
- part one: understanding yarn, needles and gauge recommendations.
- part two: learning how to choose which pattern size to knit, finding your size in the instructions and how to read schematics.
Today we're going to talk about understanding written knitting instructions and all the gibberish it appears to be. Charts are often used for instructions too and they're great for visual people, so we'll cover those great options in the next post.
For now, here is an example of written knitting instructions:
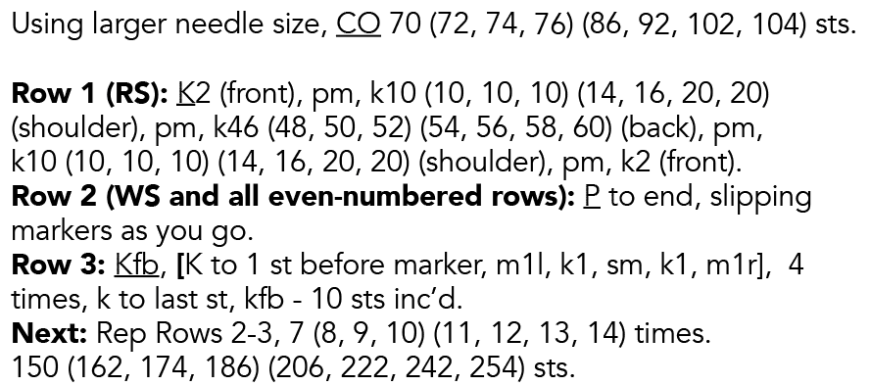
It's overwhelming to look at for the first time. It's like computer code so if you're a beginner, I'd recommend that you just focus on one line and one abbreviation at a time and work through the pattern step by step. Don't try to read ahead and understand the pattern in advance. That'll give you nightmares.
The design and techniques will unfold to you as you work through. So let's start right at the beginning.
Use larger needle size
Common in patterns that have ribbing, you would have had two needle sizes recommended to you at the beginning of the pattern. Choose the larger one out of the two. Likewise, if your pattern says "use smaller needle size", then you'd use the smaller out of the two. If you've had to change that larger size to get the gauge, then use the new size you've chosen.
CO xx sts
This tells you how many stitches to cast on. The format can cause overwhelm here and while I've used a function in my patterns to help you hide this mess, not all patterns do this. The key is understanding how to find your size in amongst all the text.
In this example, it says "CO 70 (72, 74, 76) (86, 92, 102, 104) sts." Of course, it would be much easier if only one size was available for people to knit. Then these instructions would simply read "CO 76 sts" or whichever number applied.
One number is less confusing, but writing a separate pattern for each size makes for a big pattern. If you like sewing, think of this as a "nested pattern". It's not just about efficiency either. If you're knitting a sweater and want to make the bust in one size and merge out to another size in the hips, then having all the sizes on the one pattern makes these adjustments easier. It saves you flipping between pages/files to find the other size.
So all of the sizes are given together in the one set of instructions. Each size is represented by a number set. The commas and brackets separate each size and while you could technically have the entire section written with only commas between sizes (eg 70, 72, 74, 76, 86, 92, 102, 104), it gets confusing on the eyes. So the brackets help to create a visual break.
Getting back to our example above, if I were making the smallest size then anywhere throughout the pattern that I see this format, I would always choose the first number and ignore the rest. In this example I would cast on 70 sts. If I were making the fourth largest size, then I would select the fourth number which is before the closed bracket in the middle. I would cast on 76 sts and ignore all of the other numbers.
Row 1 (RS)
Quite self-explanatory. These are your row numbers and the RS or WS abbreviations let you know if you're knitting the side that will be facing outwards when you wear it (RS or right side. The outside) or the size that will be worn against your skin (WS or wrong side. The inside).
K2
The pattern tells you how to create your garment one stitch at a time and each abbreviation you see represents a technique while the number represents the number of stitches it applies to. Patterns usually have a section which explains what each abbreviation means to help you decipher the codes. In this case, it's telling you to knit two stitches. The K tells you to knit and the number tells you how many stitches to knit. The knit stitch could be represented by an emoji or a symbol for all it matters (in fact, that's exactly how charts work!) but the K is a logical association..
(front)
This tells you that the portion you've just knit is going to become the front of your garment. It's just informative and not an instruction for you to act on. The same applies to the words (shoulder) and (back) in this pattern.
k10 (10, 10, 10) (14, 16, 20, 20) sts
This is the same concept as the CO section but with a different instruction. In this case, you knit (k) the number of stitches that applies to your size. If I'm making the smallest size, I'll knit 10 stitches and ignore the other numbers. If I'm making the fourth largest size, I'll also knit 10 stitches and ignore all the other numbers.
pm
It means "place marker". I would place a stitch marker at this point in my pattern. Stitch markers are just a visual guide for you as you knit. They might indicate where a shoulder or side seam will be or maybe even where cable detail happens. I like markers that move from row to row with me by slipping them between needles, but you do whatever works for you.
Row 1 just continues with more instructions like the one above, so you would continue moving from one step to another within the line until you've reached the end.
Row 2 (WS)
P to end, slipping markers as you go. This is telling me to purl (P) all of the stitches on my needle, right to the end and if I encounter any stitch markers, I should slip them from the left needle to the right needle and continue on.
It also says Row 2 (WS and all even-numbered rows). This is something that often trips up beginner knitters.
For the sake of less cluttered instructions, there's no point in repeating this exact line every second row throughout the pattern. Instead, they're wanting you to remember that for every RS (odd-numbered) row you finish, you'll need to repeat this row 2 and purl all of the way back to the start again. In the beginning, it can be tricky to remember this but you'll soon find your feet. If you like knitting with charts however, they will often show this row throughout the pattern. Some don't but they'll usually tell you if that's the case.
Row 3
Again, we're just walking through this line code by code.
This post isn't about interpreting every code (that's a post for another day), but for the sake of interest, Kfb is when you knit through the front leg of the stitch but before you slide the stitch off the needle, knit through the back leg too. This creates two stitches from the one.
After the Kfb, you'll see: [K to 1 st before marker, m1l, k1, sm, k1, m1r] 4 times. The square brackets indicate a group of instructions that will be repeated and in this case, this section will be worked for 4 times in total including the first time you knit it. Or they might say "4 more times" in which case, you'll work the bracketed section, then repeat it 4 more times afterwards, for a grand total of 5 times.
Sometimes this group of instructions is marked by a round bracket or maybe an asterisk *, but the concept here is the same. You are repeating a group of instructions, a certain amount of times. Here's another example of the asterisk format:
*k1, p1; rep from * to end.
In this case, the * and the ; work as brackets for your group of instructions. You would knit one stitch, then purl one stitch, knit one stitch, purl one stitch ... repeating those two stitches in sequence over and over again until you reach the end of your row.
At the end of this row it says "10 sts inc'd". Again, this isn't an instruction. It's just for information. Whenever you increase or decrease the amount of stitches on your needles, it's handy to know exactly what the stitch count has changed We all make mistakes and it's good to occasionally run a stocktake of our stitches to make sure we match the pattern. The pattern might even tell you exactly how many stitches you should have. That's even better.
Next
The last row on our example is this: Rep Rows 2-3, 7 (8, 9, 10) (11, 12, 13, 14) times. All the numbers here could get confusing, but if there was only one size in the pattern, it would read more like: Rep Rows 2-3, x times. Does that help?
The first part tells you to rep (repeat) rows 2-3. Simply look back at row 2 and repeat those instructions. Then do the same for row 3. Repeat these two rows in sequence and the amount of times you repeat it will depend on the size you're making. If I'm making the smallest size here then I would repeat those two rows, seven times each, which is actually 14 rows in total (2 rows, repeated 7 times each = 14 rows). If I'm making the fourth largest size, I'll repeat those two rows 10 times each, making a total of 20 rows.
The very last line in our example gives us a stitch count. At this point, the number of stitches on my needle should match the number given for the size I'm making. If it doesn't, you have a few options:
- Go to bed and look at it tomorrow.
- Take a breath and try to work out why. Did you miscount your stitches? Or forget an increase/decrease somewhere? Dropped a stitch? Skipped a row or didn't do enough row repeats?
- Decide it's not a big deal and move on. If you can't work out where you've gone wrong, you can often make up for it elsewhere. It's hard to let go of perfection sometimes, but if you're only out by one or two stitches and the error isn't obvious, you could find a discrete section near the underarm to increase/decrease your stitches accordingly. Did you know that some manufacturers (*cough* Ikea *cough*) are purposefully producing some items with imperfections? I love that. There is beauty in the unique nature of handmade items; they tell a story.
That's it! There may be other formats that you'll come across in patterns but this is the foundation for working your way through them. Phrase by phrase and line by line.
And if you're really stuck, contact the designer to ask them about it. While you might not get answers from the big publishers, you'll likely get a prompt response from most designers. They want you to enjoy the project too and be proud of the results.
Happy knitting!
Katrina

