How to Read Knitting Patterns - part 2
Welcome to part two of our series! If you missed it, you can find part one of How to Read Knitting Patterns here and part three is about understanding the written instructions.
Let's not muck around. You're here to knit and you've chosen your needles and yarn, you've knit a swatch and you're happy with the gauge. The next step is working out which size to make.
How to Choose Which Size to Knit
Compared to sewing or clothing size tables, knitting sizes can be a baffling array of numbers. Here's a typical example of a "finished measurements" table in knitting patterns:
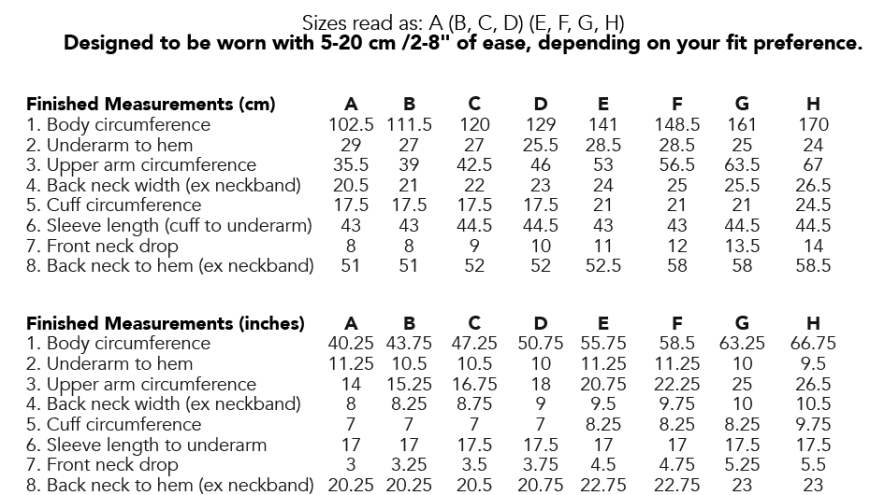
Let's start with the portion "Designed to be worn with 5-20 cm /2-8" of ease."
Ease is what decides how fitted or loose the finished garment will be. Positive ease is how much larger than your body the garment should be (this is a loose fitting garment) and negative ease is how much smaller than your body it will be (tightly fitted). It doesn't tell you here, but the photos will have shown a loosely fitted garment.
Usually, ease refers to the bust measurement, so in this case if you have an 88 cm bust, you'll want a finished garment with a 93-108 cm bust. In the cm (centimetres) section above, you'll see the "body circumference" row starts with 102.5 cm under "A" and 111.5 cm under "B". Size A is within the ease range and is a good choice. But if I like wearing loose sweaters, I could also knit size B. It's outside the ease range, but just means my sweater will be a little oversized. It's okay to step out of the box if it means you'll have a garment you love.
The other measurements are useful for checking your decision (if you go down a size, will the armholes be too tight?) or for making adjustments to suit your body shape (sleeve length, cuff circumference, longer body etc).
Reading Your Size
Once you know which size to make, you'll need to find that size in the instructions. In the example above it says "sizes read as: A (B, C, D) (E, F, G, H). If I'm making size B, then I'm only interested in any numbers that come after the first bracket throughout the pattern because that's where the B instructions are eg if a pattern says K2 (4, 6, 8) (10, 12, 14, 16), then I want to K (knit) 4 stitches. If I was making size D, then I would K (knit) 8 stitches because D instructions are before that closed bracket.
I know this can be confusing when you forget which size you're making, so I've layered my patterns which means you can turn off all the other sizes and only have your size showing. It's super handy rather than trawling the pattern to highlight your size throughout and can save a lot of needless mistakes
Schematic (Line Drawings)
Here is a schematic that's fairly typical for a knitting pattern:
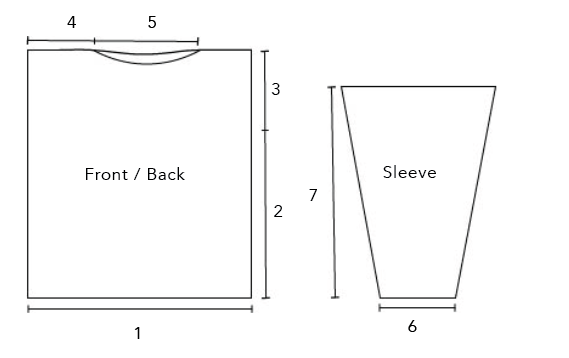
Not all patterns have a schematic (line drawing) but this is just a visual reference for the finished measurements given. For example, number four on the picture above is placed at the shoulder. In the "finished measurements" section of this pattern (not shown for the sake of simplicity), it'll say that number four is the shoulder width measurement. The picture is useful because it shows that the shoulder width is measured from the neckline to the outer edge and not from the centre back (which is another way you could measure that space). The schematic is good clarity like that.
The schematic also indicates how the garment might be constructed. In this case, the sleeves are knit separate from the body, so they're shown as a separate piece in the picture.
Another way this construction can be shown is with coloured sections like this:
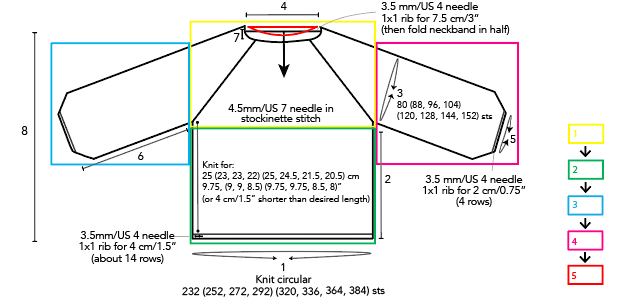
This style is often used (but not exclusively) in Japanese or Korean knitting patterns and it's great for visual knitters. On the right, you'll see a flow chart. This shows you the order that the garment is knit in. First you'll knit the yellow section, then the green one, the blue one ... and so on. The big centre arrow at the neckline tells you that the garment starts at the top and you'll knit it down towards the hem (rather than starting at the bottom and working up to the neckline).
You also have a circular arrow on the right sleeve and below the hem. This tells you that these sections are knit in the round (on circular needles or dpns). If they were knit flat, then you would see a straight line with arrows at each end instead.
There's more text on this schematic than the first example and again, it's great for visual knitters. This places the necessary information at the location where it applies, rather than having to refer back and forth between tables. Some schematics are comprehensive enough that you could knit the entire garment solely from that line drawing! This schematic isn't quite that detailed because of space restrictions due to all of the size options provided (it'll likely still have a "finished measurements" table) but it's still a handy quick reference.
Well done making it this far!
Stay tuned for the last post in this series where we'll explain how to read the text based instructions and how to use knitting charts.